Tuesday, March 31, 2009

Sugar Cane from Solano Community Garden


I pretty much missed the whole backwards beekeeper meeting this month. By the time I got there everyone was leaving but I was lucky enough to get a tour of the Solano Community Garden from Sebastian, the garden manager (it was the site of the meeting).

One of the many cool things growing at the garden is sugar cane. Sebastian gave me a piece that was trimmed from one of the plants.

He told me how you can grow sugar cane from cuttings just like bamboo. Where the joints form sprouts emerge. Just cut a sprouting section and put it in the dirt.

We put two cuttings in some plastic pots to get them going with just the tips of the sprouts above ground.


Then we watered them and mulched them with the trimmings from the larger piece that we didn't use. The trimmings will dry up and act like a straw mulch. I think plants like to have their own leaves as mulch since that's what they'd mostly get if they were left alone.

Backwards Beekeepers Meeting, March 2009


This is the Backwards Beekeepers meeting I missed most of. Looks like fun doesn't it. Luckily fellow Backwards Beekeeper Russell posted theses pictures and wrote about it on the club's blog: Beehuman.blogspot.com. That's Kelly and Erik from Homegrown Evolution in the foreground.


Here is Kirk spreading his wisdom.

Thanks Russell!

Backwards Beekeepers: The Hive Expands

Monday, March 30, 2009

California Native Flowers for Pressing


My oldest son plopped these flowers (verbena, buckwheat, California bush sunflower, monkeyflower in the background) on my desk. We identified what was what. He went outside and came back with more and announced he'd like to press them.


So we did.

Saturday, March 28, 2009

Ladybug Land


Our son received Insect Lore Ladybug Land from grandparents as a holiday gift in December.


In the past, we watched caterpillars grow. Our first run with the ladybugs was disastrous like an ill-fated Mount Everest summit. Not one larvae survived. Insect Lore replaced the batch.


Second round, we welcome three ladybugs to Camp Ramshackle. The life cycle of the ladybugs in Ladybug land is much more subtle than the caterpillars. The caterpillars grow visibly and are always moving. Our sons had a hard time sustaining interest in the small changes of the ladybug larvae. Now, however, with the ladybugs hatched and presented with a kale leaf drenched with aphids, our sons can't get enough of it.

The ladybugs race around the dome feasting on aphids. And the aphids and assorted small bugs from our infested kale, minuscule inch worms, tiny slugs, put on a great show as well. Soon we will release the ladybugs to roam in the yard and beyond.

Previously:
Butterfly Experiment Begins
Butterfly Experiment Update 1
Butterfly Experiment Update 2
Butterfly Experiment: The Release

Friday, March 27, 2009

My Boro Jeans

My jeans always get holes in them before I think they should. I don't know if they don't make 'em like they used to or if time is passing more quickly for me now, or both. What ever the case, I have resorted to crudely patching the better fitting pairs with other jeans I can do without.

In this case it was a pair of free jeans I got from a swap at work which were the donors for another favorite pair.


Here you can see the tear that was previously hand stitched back together but then tore again. This time I brought out the sewing machine and put a big patch over the entire area that was showing wear.

I am not all that into fashion but I think patched clothes might come back in style. I sometimes peruse A Reference Library and noticed these examples of boro ("rag" in Japanese) patchwork.


My pants aren't even close to the quality of the boro examples shown in the video below but I find great satisfaction in the appearance of something that has been carefully repaired. The examples in the video are truly beautiful.


Wada on Boro: Japanese Rag Textiles Go from Shabby to Chic from Andrew Galli on Vimeo.

Thursday, March 26, 2009

Glue Sticks and Dirt


The title says it all.  A simple project with the boys while we enjoy the onset of spring in our yard.  

Wednesday, March 25, 2009

Nest


When we first put up our outdoor tent a few years ago, a family of birds (we think pigeons) set up home in the rolled up canvas flaps. After they fledged, we moved the tent to a more permanent location with a platform. Now we have some sparrows trying to build a nest in the new location. Above is the beginnings of a thwarted nest. Below, some nest scraps.


I love watching birds build nests. Their meticulous search for materials, picking through piles of twigs or grass followed by the laborious flight with their beaked treasure is a process I could watch all day.


If you were sparrow, you'd be home now. Right through the tent opening.

Tuesday, March 24, 2009

Threading Spool Gift


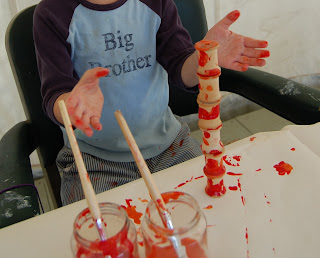
A friend celebrated his second birthday. When I asked my oldest son about gift ideas, without missing a beat he said, "Threading spools." We undertook the task of painting with great gusto.


My youngest was inspired to also do some rock painting as well. Eric and I made the threading needle and catch with a thin branch from our olive tree and some yarn. I sewed a pouch with part of a bandanna. Everyone in the family contributed. I think this was the first gift where everyone did something. I look forward to more family projects like these.

My oldest son was quite excited about presenting the gift.

Previously:
Wooden Spool Gift Making
Wooden Spool Painting
Spool Dethreading

Monday, March 23, 2009

Milling Flours


Eric is a really sweet guy. Back in December, he gave me this mill for my birthday. I use it to mill non-wheat grains and beans. In the past, I've milled amaranth, garbonzos, lentils.


This weekend, my sweet miller and I restocked our larder with sweet rice and tapioca flour.


I've seen hand crank mills and ruefully admit I'd be a lot less ambitious if I had to mill this all by hand.

Sunday, March 22, 2009

Native Bees at Work


A little while ago I spent about 20 minutes trying to snap a picture of these native bees that were working our black sage. It was no easy feat. Most of the shots show a blur or two. That is another bee in the bottom left part of the picture.

They are about half the size of a honey bee and are much faster - like a humming bird compared to a sparrow. Another thing that reminded me of a humming bird is that they were chasing each other all over the place. When one would land on a flower another would quickly come by to harass it.


If I see them again, I'll try to get a better shot. Any chance someone knows what it is?

Saturday, March 21, 2009

Flower Update


In early December, my son and I planted some tulip bulbs. I didn't think they were going to make it. Our soil was too shallow and we failed to refrigerate the bulbs prior to planting as recommended. Lo and behold, in March they bloomed.

Some more unexpected plant success, the California bush sunflower transplants now stand upright. It took almost a month.


I pulled volunteers from our dry-stack river rock wall and replanted them late in February. Below, a glimpse of them then.


The California bush sunflower is a very large plant. They will need to be replanted again to thrive. This potting of the volunteers was just an experiment. I'll see how they do here and possibly replant in an area excavated by the dogs when the time comes.

Previously:
Replanting
Bulb Planting

Friday, March 20, 2009

Manroot Maintenance


Our friends at Green Frieda were recently wondering about a strange but attractive vine at their place. We are all too familiar with it here: the dreaded manroot vine. It is native and attractive, the only problem is that it takes over everything in our yard and replicates at an alarming pace. We started with 3 or 4, I removed 3 over the years and we now have at least 6.

Here is a picture of a vine covering some elephant bush in our yard. If left on it's own it will drown out all light from the plants it grows on, then it will produce large pods covered with sharp spikes which drop bean sized seeds which, in turn, grow more vines.

In late spring the vines die back which would be OK but they become almost impossible to remove when dry - the slightest tug breaks the it. You have to climb through the bushes removing bit by bit. Meanwhile the pods have dried out and the spines are sharp as pins. This is a real problem for us since our yard is inspected each year for fire code compliance since we are in a fire hazard zone. In other words, we can't be lazy about it and leave the dead material to decompose naturally.

Here the vine from the first picture actually reaches up into the adjacent pepper tree.


We had to use our muscles but we were able to clean this one up in about half an hour. We took it straight to the compost pile. It will grow back soon and we'll have to remove what we can again, before it goes to seed, then dries out. The only way to completely eradicate a vine is to dig the root out but it's a huge tuberous thing (hence the name). I have dug out 3 total from our house and 2 of the three were the size of large watermelons but heavier - the third was only the size of a cantaloupe.


Here are the plants without the vines. As attractive as the vines are, I much prefer this view.

Previously on Ramshackle Solid:
Hedgehog Art from a Manroot Seedpod

Thursday, March 19, 2009

Bee Scarab


As we headed outside, my oldest son stopped us all with a finger point and "What's that?" Inspection was in order, the National Wildlife Federation Field Guide to Insects and Spiders & Related Species of North America consulted. Our strictly amateur identification: bee scarab (Lichnanthe apina).

Eric came home, looked at the photo and said, "That's a June bug."

Wednesday, March 18, 2009

Feeding the Bees


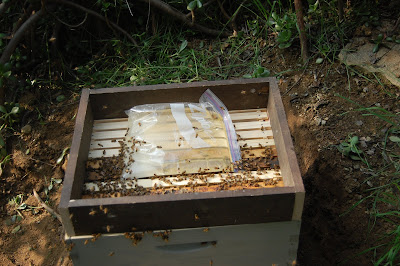
I performed my first solo bee maintenance on Saturday adding a shim and the baggie of sugar water that Kirk left with me to the new hive. The bees were nowhere near as angry as the day before but they still aren't thrilled to be without a queen.


I opened the hive, added my ramshackle shim and placed the bag where it wouldn't crush any bees hanging out on the top bars. They immediately began to investigate.


Once the liquid stopped moving I sliced a small slit in the top and let the air vent out. I don't know why I didn't get a picture of this but by the time the baggie had settled there were more than twice as many bees on it.

Here is more info on feeding bees.

Previously:
The Bees Have Landed
Ready for Bees
All bee related posts

Tuesday, March 17, 2009

Basil from Seed


Preparing pots for basil. I planted some old seeds in tin cans last week. As of today, still no sprouts. I'm going to try some newer seeds and see how that goes. Ilsa at RamblingLA wrote a nice post about planting basil seeds with your kids.

These pots are marked for a fundraiser for my son's preschool. In May, the school holds a big carnival with a handmade and garden booth amongst all the games and music. We look forward to it each year.

Monday, March 16, 2009

Fava Beans


Fava beans have been cultivated for many millennia. It feels like ours have been growing for years now but we just recently harvested a full meal worth. They are a lot of work but the beans are one of my favorites. The picture above shows about a pound, pound and a half in the pod.


Here they are 20 minutes later sans pod but in the husk. They can be eaten like this but they aren't very good with the husk. We eat them raw often by slicing them out of the husk. They taste a little like soy beans. In order to use them for a meal you really need to get all of the husks off in a hurry. The best way to do that is to blanch them - a quick 1 or 2 minutes in boiling water followed by cold water rinse.


After blanching you squeeze each bean out of it's shell - another 15 min. or so. The result is a is a pile of delicious beans that are packed with protein, fiber, and other good stuff including L-dopa (dopamine) which is said to effect everything from memory to creativity to sex drive.

I made a pasta to mix these into. I don't cook with recipes much but if you want to try it yourself I made it with with chopped kalamata olives, a juiced lemon, garlic, olive oil, fresh parsley, a tiny bit of fresh mint and the fava beans. It came out pretty good - sorry I can't give the proportions, I just make it up as I go and have the memory of a brick.

Anyway, viva the fava.

Sunday, March 15, 2009

The Bees Have Landed


The wait is over. On Friday the 13th Kirk came over with a box of angry bees and our adventure in beekeeping (backwards) began. The bees had been split from another hive by Kirk and Sebastian. They are not queen right (no laying queen) but have 2 queen cells and should be right in about a week. When bees don't have a queen, they aren't particularly happy campers. Nor do they appreciate being shut in, jostled or having their hive moved for them - understandably so.


Kirk got our medium boxes ready for the 5 large frames the bees were on by stacking our medium boxes two deep and removing 5 frames from both the upper and lower boxes. The deeper large frames will hang down from the top box into the lower one - not really how they were meant to work but it gets the job done and that's how we roll at Camp Ramshackle.


We suited up while Julia and the kids watched.

This is probably the right time to mention that I don't really have a proper beekeeping suit - its just a hat, veil and tough silver members-only-style jacket that I got from work as a holiday gift and never wore. I think I was lulled into a false sense of security after watching "Every Third Bite" (about 5 times) and seeing the beekeepers there with no equipment on at all.

As Kirk carried the nuc up to the hive site quite a few bees slipped out the cracks. They weren't in the best mood and forced Julia and the boys into the house. That left me the job of taking pictures which is not the easiest thing to do when you have a makeshift bee suit on.

Kirk smoked the nuc twice. I was a little surprised by the defensive behavior of the bees when he opened the lid. About 10 or so workers immediately flew to the camera and began trying to sting it and my gloved hands. I think they may have mistaken the black lens for a bear snout. I have to admit a moment of doubt in my shoddy beekeeping suit's efficacy but it held up perfectly.

In the picture above you can see the bees dangling from the starter strip on this frame. Kirk said that's what they do when they are getting ready to draw the comb.


Here Kirk is pointing out the queen cells.

Close-up of the queen cells.


A full brood frame goes in. After that the stragglers were dumped from the nuc to the top of the hive and it was closed up. Kirk and I went back inside for some water and home made coconut macaroons while I got some more instruction on feeding which will be in the next post. I also uploaded more pictures here on our flickr account.

A few hours later, after the air had cleared of bees I went to get the camera which I had left near the hive. I snuck around the corner to snap a picture when a handful of guards spotted me and chased me off.

Over all it was a complete thrill and I am happy to say that no one was stung (except possibly our dog Trudy - but if she was, 5 minutes later you couldn't tell) Thanks Kirk!

Previously:
All of our posts about Bees

Related:
more pictures on flickr
Backwards Beekeepers Blog