Showing posts with label shackitecture. Show all posts

Saturday, July 17, 2010

Sleepy Squirrel


Yesterday morning I was up and back from my shack a few times to get set up for the early part of the day (later it was too hot to stay in there) I noticed this sleepy baby squirrel in the crotch of a tree inches from where I put my hand each time I climb down the ladder. I was about 3 feet from it and it just looked at me as if to say "Are you going to make me get out of bed?"


Here's the scene from a distance with the sleepy squirrel in the tree near the ladder. Your only chance of seeing her is to click the picture.


Here's a close-up from the ground where you can see she's barely able to keep her eyes open. At one inspection from the shack balcony she was so unconcerned she had covered her eyes with her tail. Pretty cute.

I'm glad we built that shack.

Thursday, June 18, 2009

Shack Shelves Built with Local Lumber


I added these shelves to the shack last weekend. I just needed something built quick to get some of the junk off the floor and onto storage but it turned into an experiment with some of the branches trimmed from the olive trees which were destined for the fireplace.

I ran them through the table saw to split them in two. Then I used the chop saw to cut the 45 degree angles. If I do this again I'll build a jig to make the cutting easier and truer. That said, they aren't perfect but they are made from a solid, sustainable material and hold up the shelf just fine. I think I'll make a few more hooks to match.

Previous Posts:
Ramshackle Shackitecture
New Desk for the Shack

Wednesday, March 11, 2009

Hard Luck Screen Door

Our rickety old screen door takes a lot of abuse from dogs, the kids and frankly us too. I thought I had fixed it last time but the new nails pulled out even though they were thicker than the flimsy little brads that I used the first time.

This time I went through our jar of old screws and pulled out 10 or so matching brass wood screws that were pulled from some rotten windows in a shack on the property. In the picture above you can see I drilled the frame, used my new countersink bit and screwed it back together.


This is the adjustable countersink bit. It creates a space for the screw head to end up flush with the surface. The collar around the outside can be adjusted to the right depth with a set screw at the base of the bit. Pretty handy tool.

Here is the repair in all it's glory. This state of things lasted about 1 week (I meant to post about it sooner).

Here is how I found the screen door at about 2:00 am night before last. That is the inside layer of hardware cloth ripped from the door frame on the ground. Our dog Moxie was worked up by something in the yard. The door latch is a spring loaded twist down kind of thing that I guess she must have inadvertently hit with her paw while bouncing against the door. Next she set to work trying to get through the screen door.

The most amazing thing to me is that the stuff on the ground is hardware cloth - it's tough, and she tore it to pieces with her teeth. In my half sleeping state I managed to step on pieces of it twice, both times puncturing my feet. (oh yeah, and we all have colds right now which is why we slept through so much of the commotion - fun)

The only explanation for Moxie's determination that I can think of is that it must have been one of her arch enemies: a raccoon. Raccoons and tree squirrels are only visiting fauna she hasn't added to her trophy list. (coyotes don't come into the yard).


In this picture you can see that she was gnawing through the door by the time I got there but the screws I had added just a few days prior held. If I hadn't done the repair who knows what might have happened.

I guess I know what I'll be doing next weekend.

Previously:
Fixin' it Good
Window Repair

Saturday, March 7, 2009

New Desk for the Shack


Some days I work from home. It spares the commute, I get to have lunch with the family and simply not be in the office. Our small house is not conducive to a productive day when the kids are home so lately I have been working from the trailer. It's ok but yesterday I decided to set up shop in the shack, using some scrap wood to make a desk.


I love fancy furniture that uses free edges (like the work of George Nakashima) but we can't afford that and so have found our poor folk version of it: The split board.

We first used this accidental technique with the cookbook shelf, and in fact the desk top pictured is a section of the same board which was left outside until it split in two. The split followed the wood grain around a knot and we just went with it.

This time I didn't sand it or do anything to it. I like it just how it is. The supports were cut from a scrap from the floor joists on the shack. They screwed to the vertical 2x4's.

There is a space in the back that would allow a pen to fall but the tilt of the screen puts the bottom of the computer out exactly three and a half inches away from the wall anyway. I'll fill in the gap with a 2x4 if the gap becomes annoying but for now I like the minimalist aspect of it.

As you can see, it accommodates all of the essentials: computer, coffee cup, note pad and pencil, and phone (not pictured because it was used to take the picture). I am pleased with the outcome and in fact, submitting this first post from the chair in the photo.

Previously:
Cook Book Shelf
Ramshackle Shackitecture

Friday, October 3, 2008

French Door Hack

Before

After

When we were building the shack, we debated about what kind of doors to use. I thought a sliding glass door would be best but the new ones were just too expensive and we couldn't find the old aluminum frame kind in salvage. I like the modern looking open single large glass pane look but, again, too expensive. I decided on the cheapest french doors at the big box DIY store. I saw that the frames around the panes were just plastic pieces stuck to the surface of one large pane of glass. They aren't glued on so you can just cut them off.

I used a dovetail saw (this one is a Japanese style dovetail saw but the western kind would work just as well) because it is easy to cut a straight line right up against the edge.

Taking the frames off of both sides of each door took about half an hour but leaves little nubs. The nubs can then be cut off with two more cuts as each point of attachment.


You have to be careful with this part but it isn't difficult. It is better to be on the safe side and make more cuts and go slower so there is less to patch up afterwards.

Next you rough sand it (pictured) then fill any gaps or uneven spots with Bondo and paint. I am not going to go that far with my doors - it is a shack after all. It would probably take a total of about 2 hours to do a nicely finished job.

Tuesday, September 16, 2008

Supremely Ramshackle Shack


I really love this shack that I found on Tiny Candy . I love how cobbled together it is and how random the design appears. I aspire to build something this spontaneous looking and with such dedication to reuse.

[Note: I edited this post because I thought what I wrote would come off the wrong way - blogging is hard and should not be done late at night when you are tired.]

Link to the Supremely Ramshackle Shack

Monday, September 15, 2008

Ramshackle Shackitecture

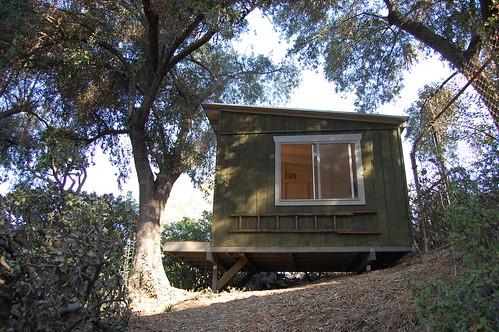
We have been working on a secret project over the past several weekends here at Camp Ramshackle - it's the Ramshackle Shack. I have been wanting a painting studio for years but with the arrival of the kids, work, etc. it just didn’t seem like a justified expense until now. At first we thought about renting a studio but at a cost of at least $500/mo. here in L.A., that didn’t make sense. We were able to build this shack style studio for about half the annual cost of renting (+ about 10 full days of labor spread over 2 months for me and Phoenix).

The design is loosely based on the West Virginia shack that Mark posted about on D&R a while back (although admittedly not as cool). I am really pleased with the outcome, none the less. There are a few details to complete still, and I need to get good and moved in. A huge thanks to our good friend Phoenix, without whom the shack could not have been built.


The shot above is the front taken from 6 feet up in the Toyon in front of it.

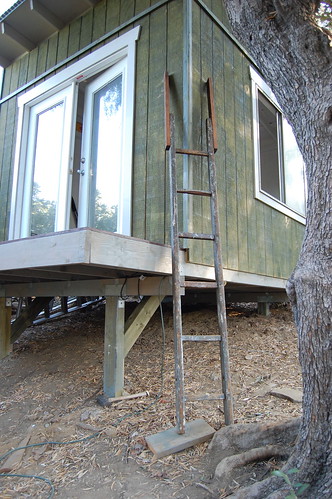
The ladder hangs on the side when not in use. Eventually we will add a more permanent entry but for now this keeps those not tall enough to reach the ladder (our 4 and 1 year old) from gaining unsupervised entry.

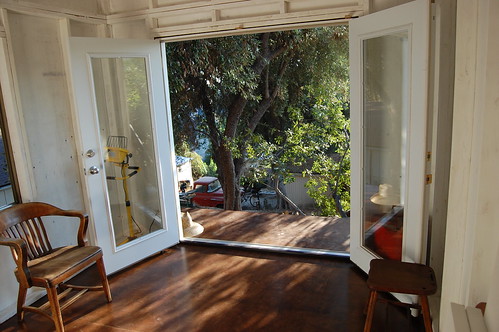
The inside is still coming together. The floor is birch plywood with walnut stain. That's the roof of our house in the background, out the window.

This is the view from inside looking out the front doors. The slope puts the height of the front porch at over 5 feet so it feels kind of like a tree house.

You can see more pictures at our Flickr account.