Tuesday, September 30, 2008

Candle Making - Depression Era Style


Here at Camp Ramshackle we love our candle light dinners. One thing that always frustrates me, though, is the 10-20% of unused wax left at the end of each candle. Last December we found a solution through a Christmas white elephant gift exchange.


I was the lucky recipient of a double boiler chocolate making kit which I initially mistook for a fondue set. I never did make my own chocolate treats but I did go to Michael's craft supply and I bought some wick string. Now we put the remnant wax from each candle in the melting pot, when it gets full I melt it and make candles with the wick and a few of the sturdier votive holders we have on hand.


The little aluminum wick holders at the bottom of the candle can be reused by prying open the hole that holds onto the wick. You then slide the new wick through the hole to the right length and trim it. There isn't any need to crimp the aluminum holder - you can simply double the wick about 1/8th of an inch, pinch it, then pull it through snug against the bottom of the holder.

The most important thing to pay attention to is keeping the wick as vertical as possible and centered in the holder. If your wick leans too much it may go out early. If it gets too close to the glass side wall, it can crack the glass or burn the holder. If the wick won't stand on it's own, I fold it over something lain across the top of the holder.


After the wax is poured out, you can save any good wick holders you may need and recycle the rest.

Our candles come out a "dusky rose" color (ok, "vomit" for those of the "half empty" perspective) due to a scented red candle that came into our house last winter. The scent has diminished to a pleasant level now and the tint just keeps getting better as it fades.

I have gotten this down to about 20 min start to finish with a large part of that time devoted to waiting for the wax to melt. Recession? Depression? I say bring it on! Soon I'll be writing about my ball of saved string.

Monday, September 29, 2008

Harvesting Pomegranates

We were lucky enough to find a mature pomegranate tree on the property when we bought our house 6 years ago. The house had sat vacant for nearly 6 years with no one to water or prune the tree. By the time we moved in it had become a tangled bramble.

I have been slowly untangling the mess since we moved in, both for the health of the tree and because pruning is one of my favorite things to do in the garden. We still haven't watered the tree at all (if it ain't broke...), yet each year we have harvested a large tub full of delicious fruit.

Last year I removed a particularly troublesome section of lower branches which were struggling for survival. They were criss-crossing their way up to the sunlight, creating a nearly impenetrable thatch of thorny growth.

The downside to removing such a large section was a slightly smaller harvest this year.

We also share quite a bit of the fruit with the wild critters (raccoons, opossums, skunks, birds, etc.)

The critter's appetites don't diminish year over year and so, with the smaller harvest, we had to pull the fruit a little early if we wanted to keep much of it.

I think that we'll have more fruit again next year. The tree has really begun to fill out more evenly, which should mean that it will be more efficient and hopefully, more productive.

No matter what happens, the pomegranates we ate today were delicious.

Sunday, September 28, 2008

Experimental Gymnastics


We don't have a lawn at our house so when we visit grandma and grandpa there is much fun to be had with experimental gymnastics.

Friday, September 26, 2008

Sweet Potato & Yam Chips


Yum. I got this idea from my son's preschool.

Sweet Potato & Yam Chips
2 sweet potatoes, peeled
1 yam, peeled
2 T olive oil
coarse salt

1. Peel sweet potatoes and yam (my four year old son was up to the task). Slice thinly. Place in bowl and coat with oil and salt.
2. Bake 375°, 20 minutes on one side. Flip chips. Bake for an additional 15 minutes.


I used a Cuisinart to slice the potatoes and yam. I suspect a mandolin would make easy work of the slicing. The thinner the chip, the crisper the baking. At my son's school, the chips were sliced with a knife. And I put additional salt on top of the slices before they went into the oven.

Very tasty and easy.

Thursday, September 25, 2008

Recipe for Gluten-Free Carrot Zucchini Apple Muffins


I had some time to try this recipe again and perfect the measurements. Happy baking.

1 cup rice flour
1/2 cup tapioca flour
1/2 cup ground flax seed (I use my coffee grinder)
1/2 teaspoon baking soda
1/2 teaspoon baking powder
1/2 teaspoon salt
1/4 cup sugar
1 1/2 teaspoon cinnamon
1 shredded carrot (about 5-7 inches in length)
1 shredded zucchini (about 5-7 inches in length)
3 cups cooked rice, pulverized in a food processor
1 cup milk (I use rice or almond milk)
1/4 cup oil (coconut oil is tasty but not essential)
1 egg
1 teaspoon vanilla
1/3 cup dried apple, diced
1/2 cup walnuts

1. Combine flours, ground flax seed, soda, powder, salt and sugar. Shred carrot and zucchini. Add to dry mixture.
2. In a food processor, process cooked rice until it becomes dough-like, about 20 seconds. Add to dry mixture. Mix wet ingredients. Add to dry mixture. Mix together. Stir in walnuts and diced dried apple.

3. Spoon into lined muffin tins to the top. Bake 375° for 20-25 minutes. Test with a toothpick to ensure completely cooked.

My original post. I tried a fresh shredded Granny Smith apple as well, but I prefer the texture the dried apple adds. And, although I have not tried it yet, I suspect golden raisins in place of apple would be delicious.

Wednesday, September 24, 2008

Making Acorn Flour

You can read lots of advice about making acorn flour by searching online. Kelly and Erik from Homegrown Evolution have an excellent section on it in their book, The Urban Homestead, which, if you haven't bought already you should right now. I made a few batches this time last year, before the book came out and what worked best is pretty much exactly what they describe. I wish I had the book then.

1. Collect your acorns.
Avoid anything that has a damaged shell, especially a dark hole or small circular scar on it about the diameter of a pencil lead. Those acorns have worms in them and are no good.

2. Shell the acorns.
This was the most time consuming part for me. I learned a trick for shelling acorns toward the end of last year's season: When dry, many will open themselves. I'm not sure if this is true of other types of acorns but our Live Oaks pop right open when dried out. If you wait for them to dry out, make sure that they get plenty of air, you don't want them to rot. If you have a dehydrator, you may consider speeding the process. Keeping them in the oven may work too if it has a pilot light.
3. Make acorn mush.
Put them up in a blender with some water. Don't be stingy with the water, you'll be rinsing them out several times before your flour is ready. Think acorn smoothie.

4. Rinse out the tannins.
Acorns contain tannic acid which is bitter, and not good for your kidneys (or iron absorption) . The good news is that it is water soluble and easy to remove. Drape a cotton dishcloth over a deep bowl, pour in your mush and rinse the it with warm water. Wring out the mush by bringing the corners of the towel together and twisting. Taste the mush, if bitter, repeat. I have heard that you don't need to make mush before rinsing the tannins out. I tried this method and my acorns were still bitter after several weeks of changing the water every day. I also tried using boiling water to rinse the mush but warm water from the tap seemed to be the best balance between water usage, gas usage and time - at least for me.

The waste water is good for plants.

5. Dry out the mush.
Next spread the mush out on a cookie sheet and either leave it in the sun on a hot dry day, put it in your dehydrator, or put it in your oven after you baking some cookies or something and let the residual heat do the job. Stir the mush occasionally to speed the process. If it clumps up and looks like ground beef it is probably going well.


Once the flour is dried out it may be a little coarse. You can put it in a cleaned out coffee grinder to get a finer texture. A good food processor also works and I am pretty sure they make attachable gadgets for mixers that really mill the flour if you get completely obsessed.

Our favorite use is acorn pancakes. Just mix the acorn flour 1/2 and 1/2 with wheat or other flour from your favorite recipe. I love the acorn flavor - slightly nutty, very hearty. If you make your own, let us know how it went.

Tuesday, September 23, 2008

Evidence of Our Survivalist Predecessors

When we moved into our house 6 years ago, I discovered several old jugs stored in the garage. A few of them, mostly bleach jugs, had been filled with water and sealed with wax. Out of curiosity I had opened one to find out what it contained even though I had a pretty good idea. I guess I was hoping for moonshine.

I remember the water being very clear - no funk at all. I think they were filled with distilled water since one of the empty jugs had a painted distilled water label from a local company called Deep Rock.

I cleaned up the empty ones but I haven't quite brought myself to emptying or even cleaning the two remaining full jugs. There is a certain intimacy in possessing an object that the previous residents had taken such care to prepare. I mean the water in those jugs was put there decades ago by someone who I have a lot in common with. It is peculiarly meaningful.

On the other hand, I'll probably dust them off and dump 'em out in a few more days.

Monday, September 22, 2008

Acorns are Dropping

Last year I made acorn flour for the first time. We didn't get much flour from the two Coastal Live Oaks in our yard but it was fun to make and now that I think I have the process down it should be easier.

Last year it was the smaller of the two trees which was the big producer. This year it appears to be the larger one. Most of the acorns I am finding on the ground have been cast there by our pesky, dog-tormenting squirrels. They take a nibble and drop the rest, but some acorns fall intact.

I'll post more about what I learned as soon as I can scrounge up the pictures and write a few coherent paragraphs about it.

Saturday, September 20, 2008

Tree Blocks


Tree Blocks are a cool toy and great company. My kids have not put these down since they were generously gifted to them.


My oldest son built this structure this morning. I don't know what I like best, the structure itself or the detailed stories of my son's imaginary dog Wincy climbing all over it.

I love toys that allow space for the power of imagination. And so do my sons. Thank you, Maryellen and family!

Friday, September 19, 2008

Refinishing Danish Modern Chairs


Eric and I picked up the Danish modern chair and loveseat at a thrift store in 2002. Together they cost $10. A good deal to be sure, but they needed a bit of work.


After letting the chairs...mature...outside for two years, I decided to start with the chair. Thanks to the weathering process, the existing varnish that had decayed to an unhealthy green-yellow hue and came off with easy sanding. I used my favorite, Watco Teak Oil, to seal the wood. Diamond Foam and Fabric cut to size new foam cushions.


The cost of reupholstering the cushions proved a bit steep for the bargain chair and loveseat. My sewing abilities were not at a level to take on the task. Eric came up with the splendid suggestion to clean the fabric. Surprisingly, a simple clean went along way. Buoyed by the success and relative ease of the chair refurbishment, I took on the loveseat. It required a bit more work. The straps needed to be replaced under the cushions. But the rest of the project moved fairly quickly.


Everyone but the dogs is thrilled with the results. Since the chairs came inside, the dogs no longer can sleep on them...when humans are around.

Thursday, September 18, 2008

Plants in the Ground


My oldest son and I planted this cilantro, mint and black kale while the youngest slept.


I've been obsessed with kale salad as of late and figured growing it myself was the best solution. I confess, I've already eaten leaves off of this small plant. It's growing well despite my raging appetite.

Wednesday, September 17, 2008

Cook Book Shelf


In a small house, every space is valuable. These cook books claimed important counter space before they found a home on this crafted shelf. The two inch thick wood was a long plank generously gifted to us from Mister Jalopy. One side of the plank was perfectly square, the other side had begun to split. The straight side of the plank was quickly used for a project.


I had been brainstorming about what to do with the cook books and came up with the idea of adding a shelf above the pantry.

I remembered the beautiful thick split wood. I checked the measurements and it seemed like it would suit the project. Instead of fighting the split, I worked with it. Eric added a beveled edge with his Japanese handsaws on the left side. The wood was oiled with Watco Teak Oil. The bracket came from Anthropologie. Eric put it up as a Mother's Day gift.


This shelf is a favorite.

Tuesday, September 16, 2008

Supremely Ramshackle Shack


I really love this shack that I found on Tiny Candy . I love how cobbled together it is and how random the design appears. I aspire to build something this spontaneous looking and with such dedication to reuse.

[Note: I edited this post because I thought what I wrote would come off the wrong way - blogging is hard and should not be done late at night when you are tired.]

Link to the Supremely Ramshackle Shack

Monday, September 15, 2008

Ramshackle Shackitecture

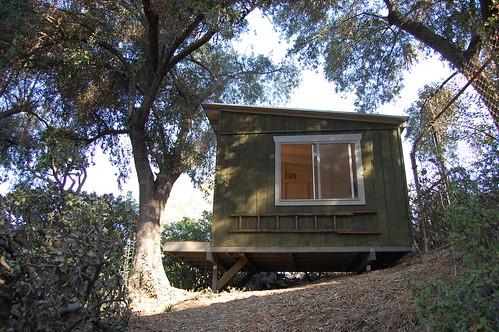
We have been working on a secret project over the past several weekends here at Camp Ramshackle - it's the Ramshackle Shack. I have been wanting a painting studio for years but with the arrival of the kids, work, etc. it just didn’t seem like a justified expense until now. At first we thought about renting a studio but at a cost of at least $500/mo. here in L.A., that didn’t make sense. We were able to build this shack style studio for about half the annual cost of renting (+ about 10 full days of labor spread over 2 months for me and Phoenix).

The design is loosely based on the West Virginia shack that Mark posted about on D&R a while back (although admittedly not as cool). I am really pleased with the outcome, none the less. There are a few details to complete still, and I need to get good and moved in. A huge thanks to our good friend Phoenix, without whom the shack could not have been built.


The shot above is the front taken from 6 feet up in the Toyon in front of it.

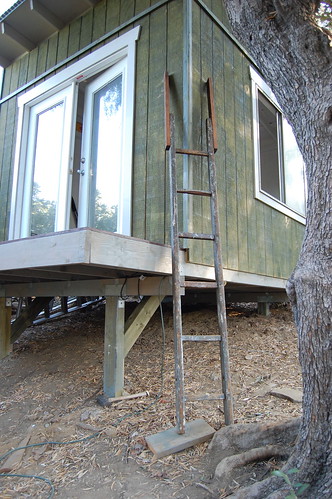
The ladder hangs on the side when not in use. Eventually we will add a more permanent entry but for now this keeps those not tall enough to reach the ladder (our 4 and 1 year old) from gaining unsupervised entry.

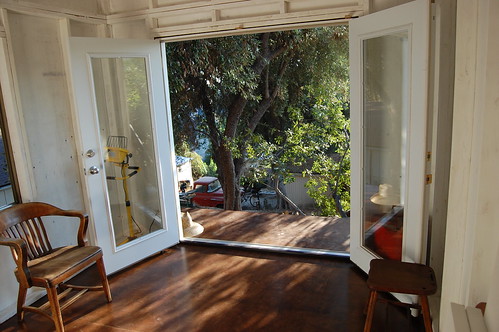
The inside is still coming together. The floor is birch plywood with walnut stain. That's the roof of our house in the background, out the window.

This is the view from inside looking out the front doors. The slope puts the height of the front porch at over 5 feet so it feels kind of like a tree house.

You can see more pictures at our Flickr account.